
1. You have access to the downloaded M2M credential on your PC
** If this is not the case please follow steps to download the M2M first ** click here for instructions
2. You have access to an M2M compatible release of PowerPro
To check this, log into PowerPro and check the bottom corner of PowerPro:

Release 2020 Build 115 or higher
You may have to update to get the latest release use Tools > Get latest Version in PowerPro
Instructions
Step 1) Figure out where the current M2M is located (if you had one before)
We will be placing the new M2M file in the exact same location
Log into PowerPro RTO and open Configuration>Application Options:

From here click on the USI tab and find the Device location field
** If that field is not there, it means your database is set to use the template manager. Please follow this link to see the template manager version **
On the example above, the exact Device Location was:
C:\Program Files (x86)\PowerProRTO-V3-Server\templates\Device Auskey\keystore-device.xml
The directory (folder) is everything before the last backslash (highlighted on image above)
Directory (folder) = C:\Program Files (x86)\PowerProRTO-V3-Server\templates\Device Auskey\
Keep this in mind, we need the new M2M credential to land here!
Step 2) Find the downloaded M2M credential
Unless the file was downloaded on a different PC and transferred to your PC, you need to be on the computer it was originally downloaded on
Once there, right-click on the Windows Icon and find the Run command
(Alternatively, use the Windows Key + R keyboard shortcut to open the Run command window)
Paste the following path as per image below:
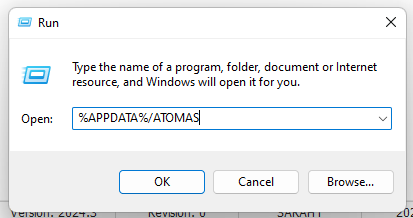
%APPDATA%/ATOMAS
Press OK this opens the default download directory for the downloaded M2M credential
Copy that file to the current existing Device location (we identified that location in step 1)
Step 3) Obtaining the M2M internal Alias
Right-click on the M2M credential and proceed to open with either WordPad or Notepad
You need to find and copy the id value and copy that to your clipboard
Step 4) Configuring the M2M fields in PowerPro
Head back to PowerPro RTO
Back to the Configuration > Application Options > USI tab

- Switch the Device type to Machine to Machine device (M2M)
- Update the Device location to the new M2M by hitting the folder icon
- Update the Device alias to what we copied in step 4
- Update the Device Password (Password that was set at the time of M2M creation)
Next steps:
- Restart PowerPro by logging off and back on
- Proceed to check if you can verify, locate or create an USI
The new USI tool should have a slightly different appearance and will be release 2020.3 or higher
Video Guide:
Please click here for the video guide